Posted on

The sad, sorry state of SAD lights

Sometimes people ask us about SAD light therapy lights. SAD means Seasonal Affective Disorder, which causes some people to become depressed during winter months when there is less natural light available.

SAD has been scientifically researched for many years. The consensus is that 10-30 minutes a day of exposure to artificial light with a sunlight-like spectrum can be helpful. And its preferable not to have UV (ultraviolet light) included in this spectrum. Easy enough with LEDs.

And how powerful should this light be in order to be effective? Research calls for about 10,000 lux.

And here’s the main problem: while virtually all SAD lights on the market say they make 10,000 lux, they don’t tell you how close the light has to be to give you that. Here’s why:

Lux depends on distance from the light. Lux is not the brightness of the light source (that’s lumens). To talk about lux without telling the distance from the light source is total nonsense.

Luckily, lux is easy to measure with an inexpensive meter. Based on some measurements we’ve done, on some of these lights you’d need to be as close as an inch or less away to receive 10,000 lux! That’s clearly not practical.

And this key information (distance) is omitted from most marketing. To be fair, we have seen a few more powerful lights which do specify the distance; some of the ones we’ve seen mention 12 – 14 inches. That’s uncomfortably close, and that’s the better ones.

The other issue is that it seems SAD lights work best from slightly above the eyeline – but most of what’s on the market is designed to sit on your desk or table, shining up at you. There are a few with stands that let you raise them higher, but not many.

If you’re in the market for a SAD light, choose one that tells you how close you need to be in order to get 10,000 lux. You might find they are a bit more expensive.

So, the natural next question is: well, Lumicrest, if you’re so smart, why don’t you make a better SAD light? We’ve considered this. But with the flood of inexpensive products all claiming to make “10,000 lux” (but maybe they’d need to be a couple inches from your head), it seems too hard to compete against all of that market noise. We could, but we don’t.

That being said, if you really want a custom SAD light solution that does what it’s supposed to, let us know …

Posted on

RGBWW LED strip says it uses 24 watts per meter, but does it really?

The label on RGBWW LED strip says it consumes 24 watts per meter. That seems like a lot. Do I really need a 100 watt power supply to run just 4 meters of RGBWW LED strip?

First of all, what’s RGBWW mean? It stands for Red, Green, Blue, Cool White and Warm White. It allows you to mix any colour (and white) using a controller. Awesome!

If you turn on the Red, Green, Blue, Cool White and Warm White LEDs full power at the same time, the end result is simply WHITE! Because R, G and B together make white, plus two other white LEDs, you get powerful white.

And, when connected like this it uses 24 watts of power for every meter (39.3″) of LED strip. That’s what the label means when it says “24 watts per meter”.

BUT, the whole point of this kind of product is to mix any colour of the rainbow, not just to make blinding white – right?
It’s meant to be used together with a colour-controller with remote control or app in order to mix the colours.

So in that case, does it still use 24 watts per meter? Obviously not! For example, if only the Red light is on, it will use about 6 or 7 watts per meter. Same if only Green or Blue are turned on. Yellow is made with a mix of Red and Green (light uses “additive” colour mixing, it’s not the same as mixing paints). To keep the colours in balance, the controller will use only about 3 watts each of Red and 3 watts of Green to make yellow. This is so it doesn’t suddenly become twice as bright when you turn it yellow!

Now, you can also add some warm white and cool white to your colours in order to get a softer effect. These LEDs use about 5 watts per meter. Again if you mix warm and cool whites to get some “in-between” white, the output of these LEDs are balanced so you don’t suddenly get much more powerful light when two LEDs are mixed.

The net result is, the MOST power you can possibly draw when using a colour-controller is only 12 watts per meter, not 24 watts! Thus for a 5 meter (16.4 foot) roll of RGBWW LED strip you only need a power supply of 60 watts (12 watts x 5 meters)

Of course, you can use a higher capacity power supply, like 100 watts if you choose. No harm will be done (it won’t overdrive the LEDs). You’re just spending a bit extra money that you don’t need to, that’s all!

Posted on

Wiring Conventions: Is the black wire positive or negative?

A simple question that’s surprisingly complex. Why? Because there are two answers, not just one.

If we’re talking about typical 110-120 volt AC wiring as commonly found in homes, shops, offices and so on, the black wire is “hot” and white wire is “neutral”. There is also a third wire, usually bare without its own insulation, which is a safety ground wire. These types of wires are found in BX and Romex /NMD90 cables. Without splitting too many hairs over terminology, that can roughly translate into black meaning “positive” and white meaning “negative”. Remember, we’re talking about AC (alternating current) here.

However, if we’re talking about DC circuits and electronics, quite often you’ll find a red white and a black wire. (Often, but not always …) In the world of DC electronics, the accepted wiring convention is that the red wire carries the positive voltage, and the black is circuit ground. Usually the red is marked as + (plus) and the black is marked as – (minus).

Notice that in both AC electricity and DC electronics, there is a black wire. But in AC electricity the black is hot (“positive”) whereas in DC electronics black is for negative.

Why? Because the worlds of AC power distribution and DC electronics developed somewhat independently, but the fact that both used black wires for different meanings was rarely an issue.

But now that low voltage LED lighting is commonplace, the question of “where to connect the black wire” has become confusing. Essentially, LEDs are a form of DC electronics – another name for LED lighting is SSL lighting, which means Solid State Lighting. As DC electronics, wires attached to LED devices usually (should) conform to DC wiring colour-code conventions.

The issue can arise when installing LEDs using an external power supply/driver, such as with LED strips (tape lights) and LED bars or even pendant lights. On the AC input to the power supply, you need to connect the hot/positive wire to the corresponding input of the power supply. But on the low voltage DC output side (12 – 24 V), the black wire means negative, and the red wire is hot/positive. If the power supply has terminals on the output side instead of coloured wires, the temptation would be to connect the black wire to the + (positive) terminal, and the red to the minus. But, LEDs being polarity-sensitive devices, the light won’t turn on! What’s more, there are even some special LED strips that can be damaged by reverse polarity connection.

AND NOW – we’ve noticed a rather disturbing trend of LED products coming out using white and black wires, with the black wire connected to positive. That’s really confusing. (China, I’m looking at you!) What’s going on?

My best guess is that there are some product engineers out there who want to “do it right” and so they go to trusty google (ok, it’s Baidu in China, as Google is blocked …) to find out what color the wires should be, and where they should be connected. And … they find some article that says black is positive/hot and white is neutral negative. But what’s missing is the fact that info is about AC WIRING only! It doesn’t apply to electronic devices like LEDs.

For LEDs, the red wire should be positive and the black wire negative. That’s it. Black wire should never carry positive in DC wiring. Got it?

Posted on

Power Certification & Symbols

Certification Labels

cETL is a mark designating that a product has met certain electrical safety standards, as certified by Intertek. cETL is recognized in Canada and the United States.

Image result for cUL logo

cUL is another certification of safety standards. It is managed by Underwriters Laboratories of Canada (ULC), an independent product safety testing, certification and inspection organization.

Image result for ul components

This symbol denotes a UL component, meaning that the unit is certified, but it also needs a separately certified enclosure. Not only must the enclosure be certified, it must be certified for this specific component.

Image result for csa certification

The CSA symbol represents approval by another standards agency, based in Canada and recognized in Canada and/or the United States.

Class 2

Class 2 status means that a power supply will not deliver more power than it is rated to provide. For example, if you load a 90 watt Class 2 power supply with 200 watts of LED strip, the power supply will only put out 90 watts. Class 2 is important for safety and power supply longevity since the power supply can only give what it is rated to give and won’t burn itself out if over-driven.

Limited Power Source (LPS)

LPS and Class 2 are functionally equivalent. Both ensure that the power supply has a limited voltage and current output, for safety purposes. Because they are different certification standards, there is a lot of overlap in their definitions.

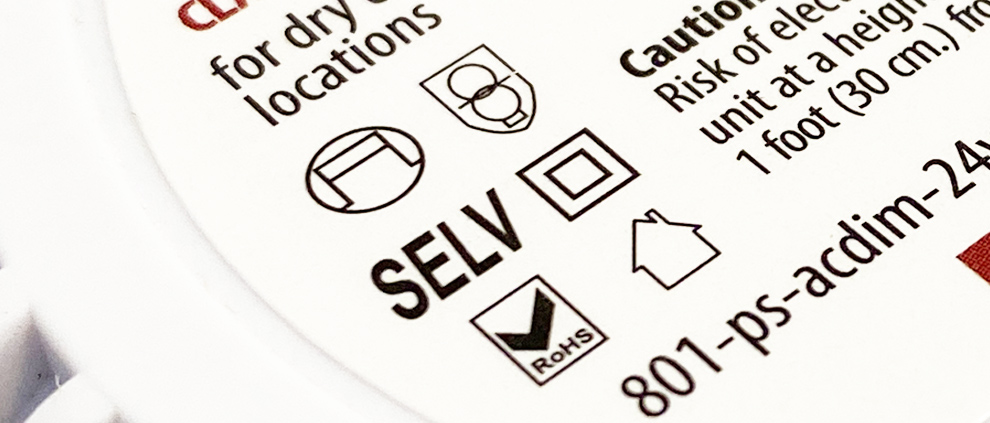
Double Insulation (Class II)

Class II and Class 2 often get confused, but they focus on very different aspects of power supplies. Class II designation means that the power supply relies not only on simple electrical insulation, but 2 layers (or a single reinforced layer) of insulation, and therefore does not require an earth ground connection. This is why on Class II power supplies, there is no ground pin on the input.

Posted on

Mercury in Fluorescent Lights

Many people are not aware that fluorescent tubes and compact fluorescent light bulbs (ie. ‘curly bulbs’ or CFLs) contain liquid mercury. (By contrast, Lumicrest LED lights contain NO mercury!)

Is mercury really something to be concerned about?
Some facts:

– The mercury from one fluorescent light tube, approx 23 mg. can contaminate 30,000 litres of water above safe drinking limits.
– 1/70th of a teaspoon of mercury can contaminate a 25 acre lake, rendering the fish in it unsafe to eat for 50 years.

Why is mercury bad?
The nervous system is very sensitive to all forms of mercury. Exposure to high levels of mercury can cause permanent brain damage, central nervous system disorders, memory loss, heart disease, kidney failure, liver damage, loss of vision, loss of sensation and tremors.

Bad news for the environment:
The recycling industry estimates that of the hundred of million of CFLs purchased each year only 2% are recycled. That’s millions of CFL’s (containing 4-5 mg mercury EACH) in the trash.

Irresponsibly adding billions of spent and broken CFLs to our landfills is a looming environmental problem of epic proportions.

Hg is the chemical name for Mercury.

Here is a detailed article on how mercury in landfills pollutes the environment: http://www.newmoa.org/prevention/mercury/landfillfactsheet.cfm

Environment Canada’s Mercury in the Environment website also provides information about the adverse environmental and health effects of mercury: http://www.ec.gc.ca/mercury

For more information on the mercury in CFLs (compact fluorescent lights):
http://www.ec.gc.ca/mercure-mercury/default.asp?lang=En&n=2486B388-1#CFL

How to clean up if you break a CFL (from the Environment Canada website):
http://www.hc-sc.gc.ca/hl-vs/iyh-vsv/prod/cfl-afc-eng.php

  • If you break a CFL, follow these directions for clean-up:
    • Leave the room
      • Remove people and pets from the room and keep them out of the room during the clean-up process.
      • Avoid stepping on any broken glass.
    • Ventilation
      • Ventilate the room for at least 15 minutes prior to starting clean-up by opening windows and doors to the outdoors. This will ensure that mercury vapour levels are reduced before you start cleaning.
    • Clean-up Directions for Hard and Carpeted Surfaces
      • Do not use a vacuum to clean up the initial breakage, as it will spread the mercury vapour and dust throughout the area and may contaminate the vacuum.
      • Wear disposable gloves, if available, to avoid direct contact with mercury and to prevent cuts.
      • Scoop or sweep up the broken pieces and debris with two pieces of stiff paper or cardboard.  Do not use a broom.
      • Use sticky tape, such as duct tape or masking tape, to pick up any remaining fine glass or powder.
      • Wipe the area with a damp paper towel, cloth or disposable wet wipe to remove any residual particles.
      • Place the broken glass and clean-up materials in a glass container with a tight fitting lid to further minimize the release of mercury vapour.
    • Carpeting – Steps to Take After the Initial Clean-up
      • If the rug is removable, take it outside, shake and air it out for as long as is practical.
        • The first time you vacuum on installed carpet after the clean-up, shut the door to the room or close off the area as much as possible and ventilate the room in which the lamp was broken by opening the windows and doors to the outside. When the vacuuming is done, remove the bag, wipe the vacuum with a damp paper towel, cloth or disposable wet wipe, and then place the vacuum bag and paper towel in a sealed plastic bag outside.  In the case of a canister vacuum, wipe the canister out with a wet paper towel and dispose of the towel as outlined above. Continue to ventilate the room for 15 minutes once the vacuuming is completed.
      • Disposal
        • Immediately place waste material outside of the building in a protected area away from children.
        • CFL contains mercury

          Dispose of the waste at a household hazardous waste location as soon as possible.  Check with local, provincial, or territorial authorities about the requirements for recycling and for the location of household hazardous waste depots or pick-up.

        • Do not dispose of the waste in your household trash.
        • For further information on disposal, please contact Environment Canada.
      • Washing
        • Wash your hands after storing and disposing of waste.
      • Additional Information
        • Remove and install the CFL by handling only the base of the lamp to prevent any unnecessary pressure on the glass that may cause it to break.
        • Consider using a drop cloth when replacing a CFL to minimize the chance of breakage should the lamp fall or to protect the flooring and assist in clean-up should the bulb drop and break.
        • Store fluorescent lamps in containers that prevent them from breaking, such as in their original packaging.
        • Consider avoiding the use of CFLs in areas where the lamps may be easily broken.
Posted on

Lighting Basics

If you are new to lighting and find some of the terminology confusing, these videos help you demystify things.

David Geldart, President of Lumicrest, brings you a quick introduction to the most common types of lighting you’ll find in use today, including incandescent, fluorescent, halogen and of course, LED lighting.


Posted on

Lens Beam Angle

Selecting the most appropriate lens beam angle can sometimes be confusing. When to choose a wide beam lens and when to choose a narrow beam lens? The video below helps you understand the differences and make the best choice.

What lens angle should I choose? This handy Beam Angle Calculator helps you determine the effect of different beam angles and different positions for your light fixtures.

Want to change the lens angle on a Lumicrest LED light? Watch this short video on how to swap the lenses on Lumicrest LED lights.

Still not sure? Contact us at 416.479.0132 or through our contact form and let us know what you’re trying to achieve. We’re glad to help!

Posted on

Why LED Lighting?

If you’re a professional and are thinking of upgrading the lighting at a museum or art gallery, you’ll want to read our LED Lighting for Museums and Galleries White Paper. Contact us to request a copy.

Lighting is a key factor in the comfort and aesthetics of every environment. Before LED lighting, you had to reduce the quality of your lighting in order to save energy. Compact fluorescent lights (CFLs) have been useful in reducing power consumption. However, CFLs’ harsh light, high UV emissions, non-dimmability, slow response, poor color rendering, and the environmental impact of their mercury content, mean they’re far from the ultimate answer.

Think that LED lights only produce the harsh blue tinted light like the first generation of LED Christmas lights? Not any more. Lumicrest’s LED lights produce a warm glare free light that is pleasing to the eye.

Environmentally Responsible
With Lumicrest’s LED products, now you can have clean, clear light directed exactly where you want it. Our lights contain no toxic mercury, unlike the common compact fluorescent bulb. They last over 25,000 hours, compared to 1,000 hours for an incandescent light bulb, 2,500 hours for a halogen light or 6,000 hours for a compact fluorescent. The absence of mercury in LED lights, avoids contamination of our landfills, and eliminates cleanup concerns when a fluorescent light is broken.

Big Energy Savings
Best of all, in a time of rising energy prices, you can save 80% or more on your lighting energy compared to halogen or incandescent lights. At first, you may be surprised at the initial cost of our LED lights. When you look closer, you understand how inexpensive they really are! Depending on how many hours per day your lights are on, your initial investment can pay itself back in a year or less, and you’ll save money for years to come.

Save on Bulb Replacement Costs Too
The energy savings alone make a compelling enough case for LED lighting – replacing a 50 watt halogen light with an 8 watt LED is a huge saving. However, when you factor in the long life of our LEDs, the picture gets even brighter. On average, you’d have to buy about 18 halogen lights during the life of a single Lumicrest LED light! The cost of replacement bulbs alone pays for the LED over its lifetime – AND you get huge energy savings as well.

Calculate the Benefits
Try our online LED Energy Savings Calculator and plug in the numbers and see for yourself. In commercial environments, you may have to pay outside labour to change your existing bulbs, so our calculator allows you to factor in the labour savings as well.

Reduce the Damage to Sensitive Works
Light rays (photons) cut through atoms of fragile color molecules and organic materials, breaking the bonds that hold the molecules together.
These images show the effect of long term exposure to UV on a 20th century oil paint. (images courtesy of the Canadian Conservation Institute)

When viewed in colour under an optical microscope, the upper image where the paint was unprotected shows the colours have faded, while the lower image shows the colours retained their original intensity when protected from UV.

When viewed in black and white under an electron micrograph, the upper image shows the surface of the oil medium eroded and cracked, while the lower image shows the surface stayed smooth and undamaged when not exposed to UV.

The best preventative measure is to switch to a light source that does not emit UV nor unwanted heat from IR rays. Lumicrest’s LED lights emit no UV nor IR and can extend the life of light sensitive works by up to 5 times or more.

Contact Us
Call us today at 647.360.6475 to discuss how Lumicrest LEDs can improve your lighting and save you plenty of money on your energy costs.